Have you ever looked at a pot and wondered whether the liquid was boiling, simmering, or simply getting hot? You are not alone. These two basic cooking methods look similar, but using the wrong one can completely change the texture of a dish.
Boiling is fast, active, and aggressive. Simmering is slower, calmer, and better suited to ingredients that need gentle treatment. Pasta usually benefits from boiling water, while soups, stews, sauces, and tougher cuts of meat generally improve at a steady simmer.
Understanding boiling vs. simmering is not only about memorizing temperatures. You also need to recognize the size of the bubbles, the amount of movement in the pot, and the effect that movement has on your ingredients.
This beginner-friendly guide explains the difference between boiling and simmering, when to use each technique, and how to control the heat without constantly checking a thermometer.
1. The Main Difference Between Boiling and Simmering
Both boiling and simmering are moist-heat cooking methods. Food is cooked in water, stock, sauce, or another water-based liquid, but the temperature and level of movement are different.
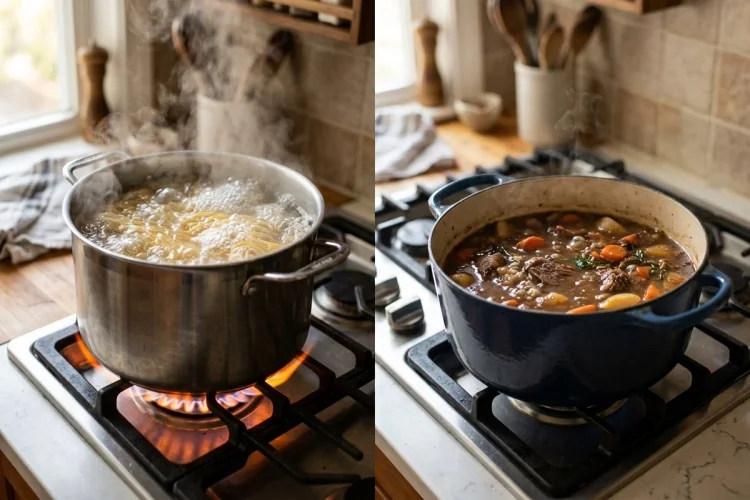
A full boil produces large, rapid bubbles across the surface. The liquid moves vigorously, ingredients are pushed around the pot, and steam escapes quickly.
A simmer is noticeably gentler. Small bubbles rise slowly and break the surface occasionally or steadily, but the liquid does not churn aggressively.
That difference matters because bubbling creates physical movement. A rolling boil can break delicate ingredients apart, make some proteins tougher, and cause thick sauces to splash or burn. Simmering allows food to cook with less disturbance.
Rouxbe describes poaching, simmering, and boiling as submersion techniques in which relatively small temperature differences can produce very different results.
2. Boiling and Simmering Temperatures Explained
At sea level, water reaches a full boil at approximately 212°F or 100°C. You will see large bubbles continuously rising and bursting across most or all of the surface.
Simmering happens below the boiling point. Culinary guides commonly place a simmer somewhere around 180–205°F or 82–96°C, although the exact range varies depending on whether the recipe calls for a slow, regular, or rapid simmer.
You do not usually need a thermometer. The appearance of the liquid is more practical:
At a gentle simmer, you may see a few small bubbles around the edges and occasional movement in the center. At a regular simmer, small bubbles rise steadily but the surface remains relatively calm. At a rolling boil, large bubbles rise rapidly and cannot be stopped by stirring.
Boiling temperature is also affected by altitude. Water boils at a lower temperature as elevation increases, which means boiled or simmered foods may require longer cooking times in high-altitude locations.
The USDA notes that water boils at about 208°F at an elevation of 2,000 feet rather than 212°F.
3. When Should You Boil Food?
Boiling is useful when food can handle strong movement and needs to cook relatively quickly. It is commonly used for pasta, certain grains, potatoes, dried beans, eggs, and sturdy vegetables.
Pasta is a classic example. The active movement of boiling water helps keep the pieces moving, while the high temperature cooks the starch efficiently. Stirring during the first few minutes further reduces sticking.
Boiling is also central to blanching. In this technique, vegetables are briefly placed in boiling water and then transferred to ice water to stop the cooking. This is useful for ingredients such as green beans, broccoli, and tomatoes.
However, harder boiling does not necessarily make food cook dramatically faster once the liquid has reached its boiling point. Extra burner power mainly creates more agitation, steam, and evaporation.
Use a pot with enough room for the liquid and ingredients. Adding a large quantity of cold food may temporarily stop the boil, so allow the water to return to the required level of bubbling before starting the recipe’s cooking time.
4. When Is Simmering the Better Choice?
Simmering is ideal for dishes that need time for flavors to combine or ingredients to become tender. Soups, stews, curries, stocks, beans, braised meat, and tomato sauces are usually simmered rather than aggressively boiled.
The gentler movement protects the structure of the food. Beans are less likely to split, vegetables retain their shape more effectively, and pieces of meat are not thrown around the pot.
A steady simmer also allows liquid to reduce gradually. As water evaporates, a sauce may become thicker and more concentrated. You still need to stir occasionally, especially when working with thick sauces containing tomatoes, dairy, starch, or sugar.
Long, gentle cooking can help tough cuts of meat become tender as connective tissue gradually breaks down. Boiling the same meat too aggressively may tighten its proteins and create a dry or chewy texture before the connective tissue has softened sufficiently.
Allrecipes recommends simmering for pot roasts, stews, tougher meat, and delicate foods that benefit from controlled cooking.
5. Why Recipes Say “Bring to a Boil, Then Simmer”
Many recipes instruct you to bring the liquid to a boil before reducing the heat. This may seem unnecessary-why not heat everything slowly until it simmers?
Starting with higher heat saves time. It quickly raises the entire pot to the required temperature, particularly when it contains cold stock, vegetables, meat, or canned ingredients.
Once the liquid boils, reducing the burner gives you a clear starting point for establishing a steady simmer. Lower the heat gradually and wait for the large bubbles to disappear. The goal is to maintain small, controlled bubbles rather than stopping all movement.
Do not begin counting the simmering time while the liquid is still warming unless the recipe specifically tells you to do so. Phrases such as “simmer for 30 minutes” usually mean 30 minutes after the correct level of gentle bubbling has been established.
Bringing a dish to a boil before lowering the temperature is both faster and often easier to control than trying to approach the perfect simmer slowly from a cold start.
6. How to Maintain a Steady Simmer
Once the liquid reaches a boil, lower the burner to medium-low or low. The exact setting depends on your stove, pot, quantity of liquid, and whether you are using a lid.
A heavy-bottomed pot can distribute heat more evenly and reduce hot spots. Wider pots encourage faster evaporation, while narrow, deep pots generally retain liquid for longer.
The lid also changes the process. Covering the pot traps heat and moisture, helping liquid reach a boil faster and reducing evaporation during cooking. Leaving it uncovered encourages reduction and makes it easier to watch the bubbles.
If a simmer repeatedly turns into a rolling boil, move the pot partly off the burner for a moment or reduce the heat further. On an electric stove, the burner may take time to cool, so transferring the pot briefly to a cooler burner can provide faster control.
Check the pot regularly until the heat becomes stable. A recipe may simmer calmly for several minutes and then begin boiling as the pot, pan, and ingredients continue absorbing heat.
7. Common Boiling and Simmering Mistakes
One common mistake is using the stove dial as the only guide. “Low” does not automatically mean simmer, and “high” does not guarantee the correct boil. Different burners, pans, and amounts of liquid behave differently, so watch the bubbles rather than relying only on the setting.
Another error is keeping everything at a rolling boil. Strong bubbling can break potatoes, beans, dumplings, fish, and tender vegetables. It can also make stocks cloudy by constantly mixing fat and particles into the liquid.
Overcrowding is equally problematic. Too many ingredients lower the liquid temperature and restrict circulation, resulting in slower or uneven cooking.
Be careful with thick liquids. Chili, tomato sauce, and creamy soup can form large bubbles that burst suddenly and splash hot liquid. Keep these dishes at a gentle simmer, stir from the bottom, and use a partially covered pot when necessary.
Finally, remember that simmering does not mean abandoning the pan. Liquid can evaporate, ingredients can stick, and flavors can become overly concentrated. Taste periodically and add a little water or stock if the dish becomes too thick before the ingredients are ready.
The difference between boiling and simmering comes down to temperature, bubble activity, and the amount of movement in the pot.
Boiling produces large, vigorous bubbles and works well for pasta, blanching, potatoes, and sturdy ingredients. Simmering uses gentler heat and is better for soups, sauces, stews, beans, and slow-cooked meat.
Instead of relying entirely on your stove’s settings, learn to read the liquid. Large, constant bubbles indicate a boil, while smaller and calmer bubbles signal a simmer.
Practice both methods during your next meal. Bring pasta water to a rolling boil, then prepare a sauce at a gentle simmer. Watching how each liquid behaves will quickly make these essential cooking techniques easier to recognize and control.